Get to know the beMatrix products in 14 steps
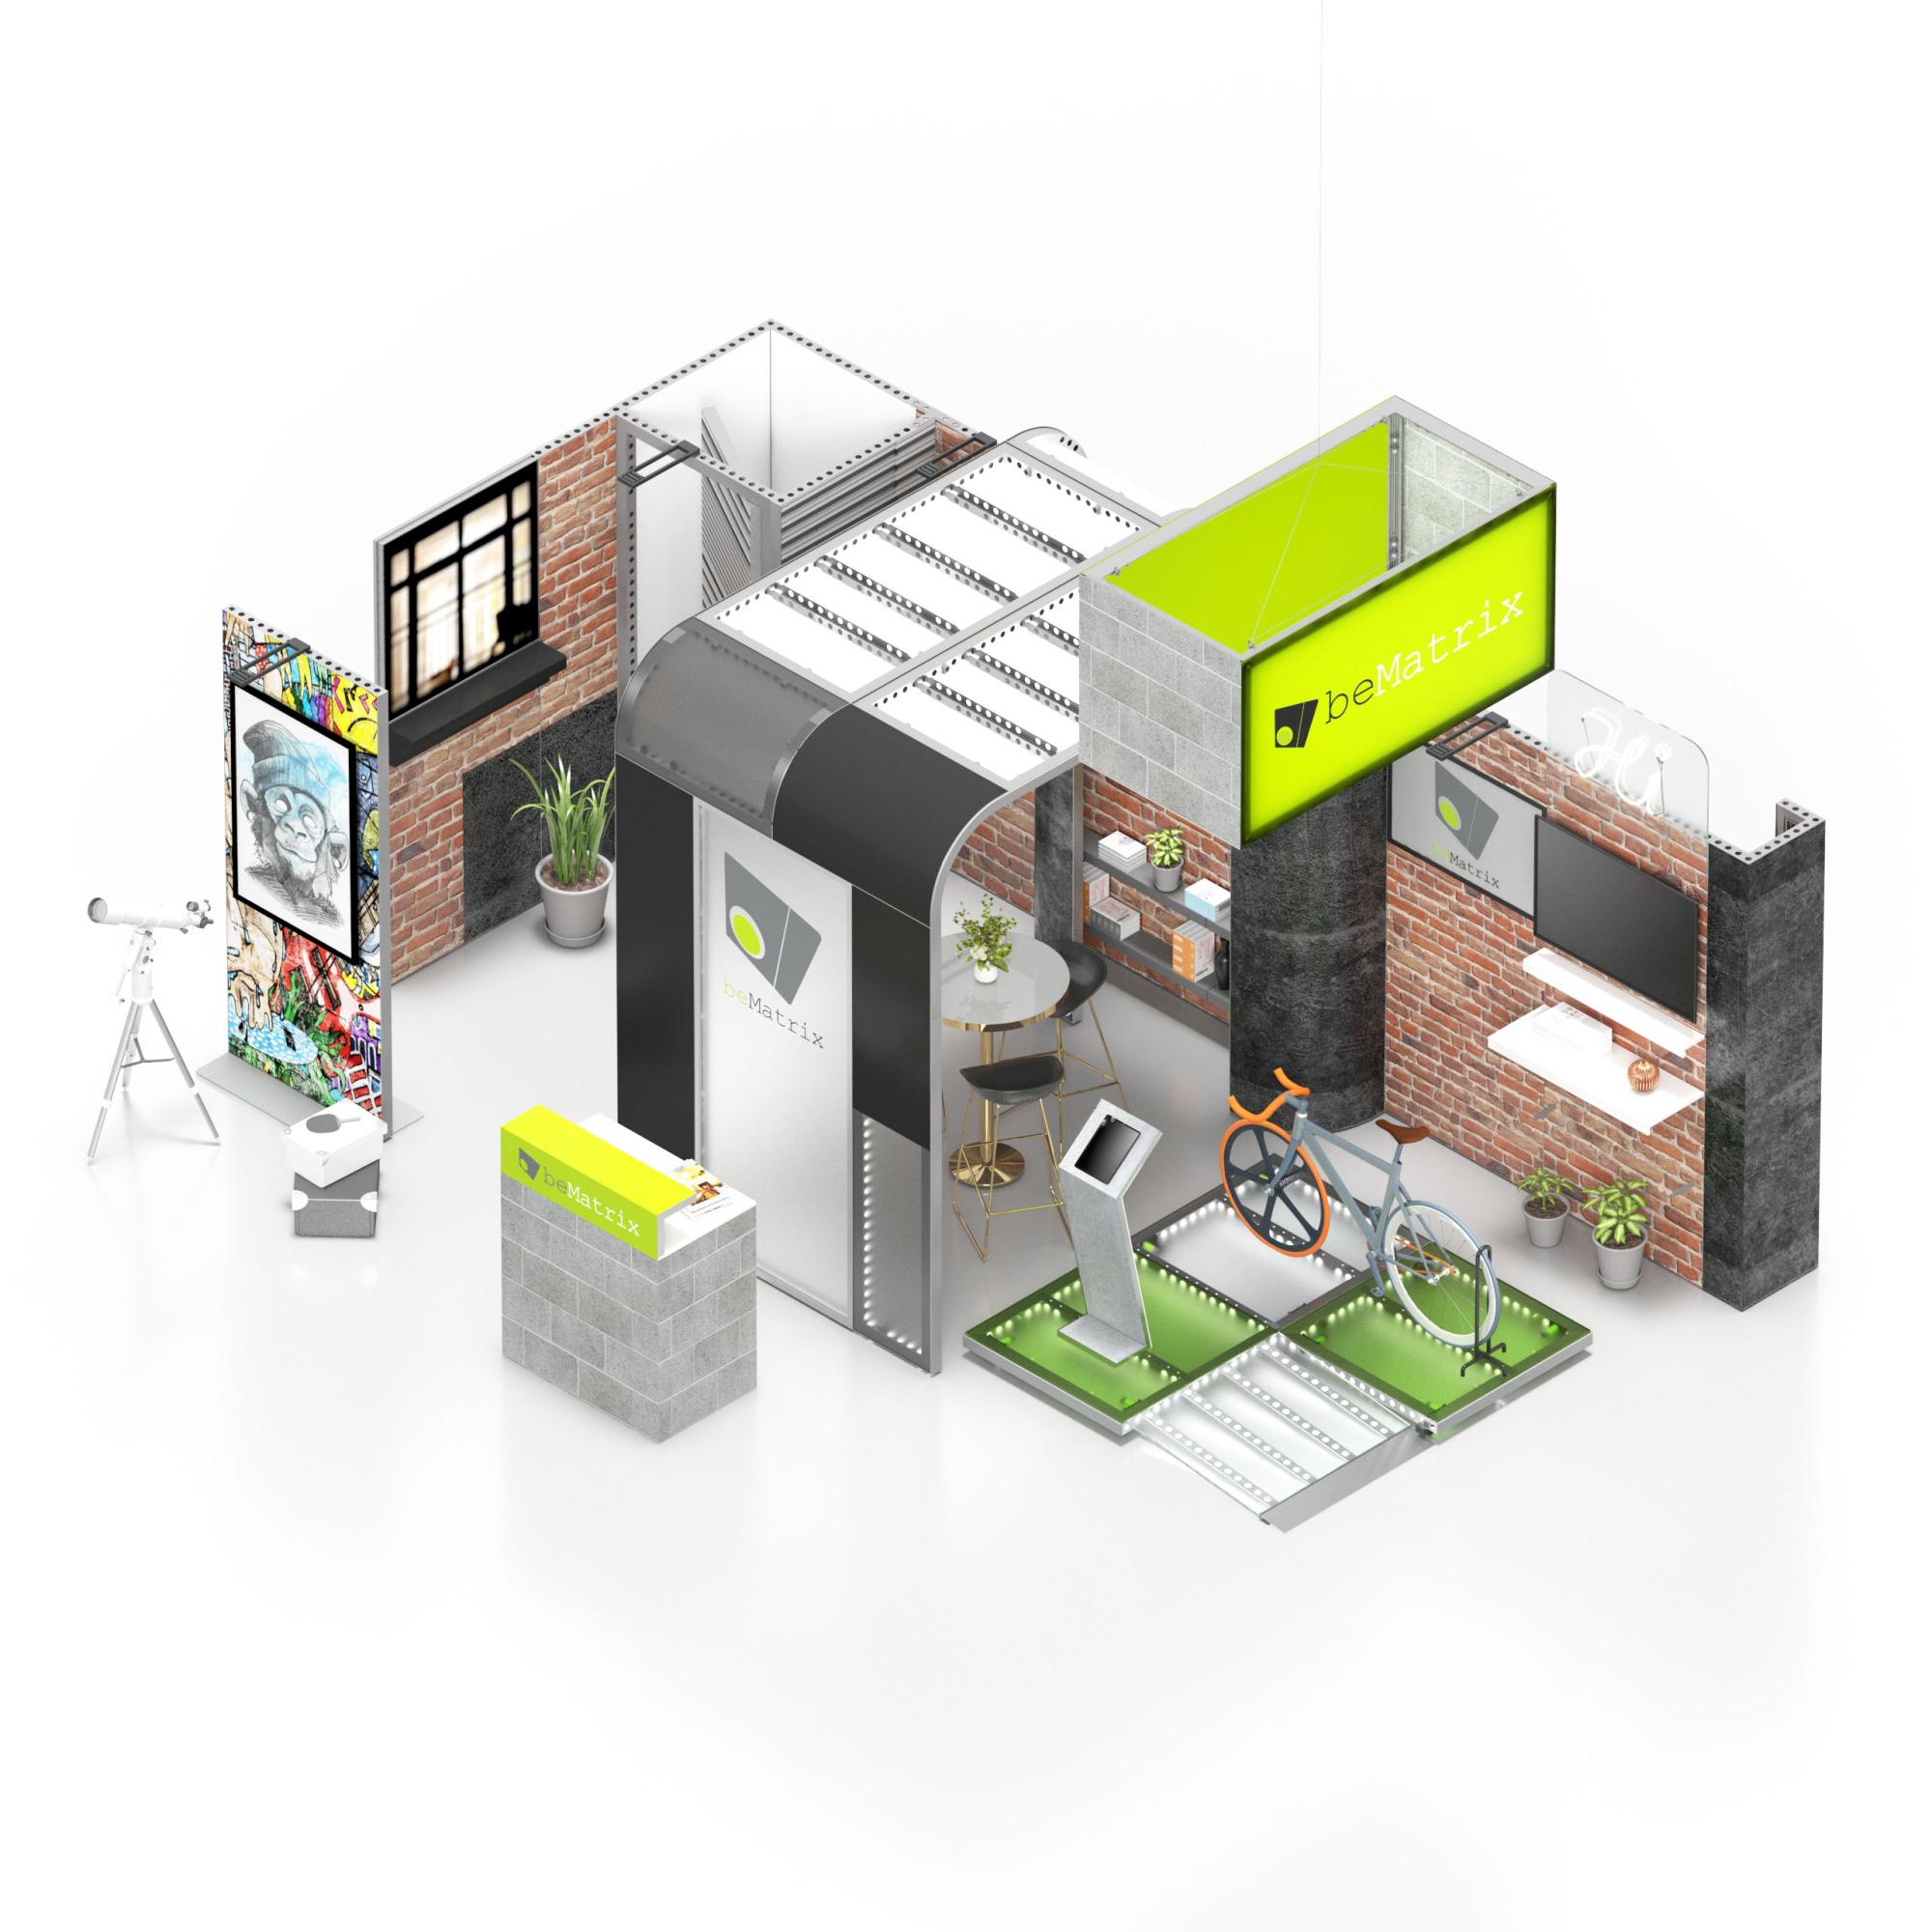
The beMatrix Academy has been a constant in our calendar for years. It is the ultimate opportunity for customers to visit the beMatrix showroom and build a small but beautifully finished stand from start to finish together with the beManiacs. After all, by building the stand yourself, you really get to know the system and experience how easy it is.
Haven't attended one of our Academies yet or need a refresher? In this blog post, we will guide you step by step through our signature Academy stand!
Table of contents
In this blog post, you will learn the following steps.
STEP 1 - first wall
STEP 2 - door
STEP 3 - arches
STEP 4 - finish structure
STEP 5 - hide hole pattern
STEP 6 - light boxes
STEP 7 - corners
STEP 8 - base plates
STEP 9 - shelf supports (for shelves)
STEP 10 - flat screen support
STEP 11 - boxscreen
STEP 12 - furniture
STEP 13 - lighting
STEP 14 - infills
STEP 1 - first wall
Start by connecting straight b62 frames. Under each frame, place a 180° ECO pin for connection and stability. These pins are made of Zamak (zinc, aluminium, magnesium and copper) and therefore much more environmentally friendly than chromed pins. You attach the pins to the frame with the M8 connector. Then you connect the frames in no time with the Fast Clamp connector.
The frames now form a straight back wall. We also place two b62 frames at a 90° angle against each other. Tip: by quickly building a 90° angle, your construction is immediately stable.
Thanks to the 62 matrix, no gap can be seen between the frames. This sets our system apart from others on the market. It fits like a glove! In addition, the perfect 62 matrix ensures that all your constructions will be stable and thus secure.

STEP 2 - door
Even the smallest exhibition stand cannot do without a storage area. Just think of the valuables you want to give a place, a small cloakroom for the exhibitor or a storage area for food and drinks. In step 2, you add a single pivoting door to the back wall. The door has a width of 992 mm and a clear passage of 741 mm. Did-you-know: you immediately obtain 4 directions of rotation with 1 type of door? Inside left & right and outside left & right.

STEP 3 - arches
With an arch, you bring life to your design. Our range of curved frames opens up many creative possibilities. The straight and curved frames naturally fit together seamlessly. However far-reaching your ideas are, our range of curved b62 frames with 7 radii will help you build what you envision.

STEP 4 - finish structure
Our system allows you to build ceilings, floors and walls using the same frames. In step 4, you add the ceiling and a small section of the floor. The stand already forms a harmonious whole.
Use a ramp and connect it to your floor so that your stand is accessible to everyone. In addition, finish the structure of the floor with a reinforcement bracket.

STEP 5 - hide hole pattern
Often exhibitors want to hide the holes in the frames, we show that too in this Academy stand. We use b62 covers in combination with the steel covers (for the arches) to make the hole pattern invisible.
You attach a Coverclip to the holes and click the cover onto it. The rubber on the Coverclip prevents the cover from shifting.
Steel covers are a must for 360° constructions. They finish off your stand and ensure that it forms a sturdy whole. Mount them using M8 pins.
STEP 6 - lightboxes
The next step is all about lightboxes. These are, in our opinion, indispensable - even in smaller stands. They make your stand more exciting and, thanks to LEDs, visuals come across much more powerfully.
In the beMatrix range, you will find both single-sided and double-sided lightboxes. Here, we use the 62s sideLED lightbox. With its 62mm width, it fits seamlessly with the b62 frames. The perfect building block in your assortment!

STEP 7 - corners
With the frame system you can not only build straight or curved structures, but you can also create 90° corners (or any other angle degree with an adjustable Perfect Corner).
In the Academy stand, here we add a Perfect U with thus two 90° angles. The Perfect U is a ready-welded frame that, in combination with b62 frames, opens a lot of doors for you. The Perfect corner consists of a lock connector and a support profile. This makes it possible to add three separate straight panels. Consequently, you don't need to make a V-groove in your panels or fabric, reducing the risk of damage.

STEP 8 - base plates
In step 8, we add a stand-alone frame. Ideal if you want to highlight a particular message extra. Of course, it must remain stable. We have products for that too!
Heavy, steel base plates are used to give a structure extra stability or so as here as a plinth for free-standing frames. Base plates are available in various shapes and sizes. Did you know that the corners of base plates are always rounded off to prevent visitors from hurting themselves?
In the stand here, you take a base plate that is visible on two sides of the frame. But we would like to inform you that we also have semi base plates in our range; these are only visible on one side of the frame.

What you need:
Base plate (incl. necessary connectors)
STEP 9 - shelf supports (for shelves)
With beMatrix's shelf supports, you can integrate shelves into your stand (or storage). In this design, we use the shelf supports to put wooden shelves on them. A neat way of displaying products.
Tip: the shelf supports can also be used to support the top of your reception desk, for example.
STEP 10 - flat screen holder
TVs are a must in any modern stand today. Therefore, in this stand we also show you how to integrate it when building with beMatrix.
With the galvanised steel flat screen holder, you can integrate screens in two ways, built-in (and thus flush with the frame system) or built-up. In the second, the screen comes out in front of the panel.
Want to integrate a TV without using a bracket? Then we recommend you consider the beTV. The beTV is 75" TV mounted in an aluminium frame measuring 992x1984mm. You can mount this unit easily and without a bracket.
In this stand, we mount the flat screen holder on the frames.
STEP 11 - Boxscreen
You want your stand to stand out from afar too. A classic from the range is the Boxscreen which does this for you. Boxscreens are sturdy hanging constructions. Both the Boxscreens themselves and the textile fabrics are easy to assemble. You can count on a seamless finish! The Boxscreens are available in various sizes.
In terms of assembly, the Boxscreen is also set up in 1-2-3. The corner pieces are already assembled. Just add the straight pieces and step 11 is done!
STEP 12 - furniture
The stand is almost ready, so get set for the finishing touches. Besides the versatile frame system that gives you countless possibilities, we also have the iZi-range: modular furniture such as bars and tables for your stand.
In this stand, we use one iZi-bar. This versatile counter is often used as a reception desk, but also as a bar or cabinet. The iZi bar includes two shelves, lockable doors and adjustable feet. Naturally, it is fully customisable with panels or textiles. We have added the iZi-bar elevation for a high-end look.
The standard dimensions of this furniture are 992 X 620 X 992 mm. Available in all RAL colours (standard in RAL 9006 TEC).

STEP 13 - lighting
Time to put the stand in the spotlight! We have a wide range of lighting; something for everyone: accent, mood, or general lighting. In this design, we opt for the SAM Light.
This rotating LED lamp stands out for its sleek and stylish design, its various surface-mounting options and its use of LED technology. Up to 6 SAM Lights can be connected to one power supply (160 W). The integrated LED lamps can be directed 340°, allowing you to illuminate any surface from any angle, even upwards! Change the atmosphere on your stand by switching between cold and warm light.

STEP 14 - infills
"Keep the body, change the skin", you've heard us say before. The frames are endlessly reusable and the infills can change every time.
Panels
Panels made of PVC, sandwich panels, wood, (acrylic) glass...? Anything goes! Panels can easily be attached to frames with Velcro, with the hook side being placed on the frame and the loop side on the panel. Our Velcro is made so that your panel will always stay securely in the frame - whatever!
Textile
You can also use textiles as infill. The silicone tendon of textile fabrics is stretched over one or more frames.
Use the tools T-REX and Platypus to get the job done for you.
The T-REX is a cutting tool designed to cut out parts of the silicone strip so you can better fit textiles over multiple frames. Safer and more precise than a knife, this product cuts through silicone with ease.
The Platypus has a beak and tail like a platypus. The beak is designed to help you remove panels from frames with ease, while minimising the risk of damage to infills. The tail can help you insert very tight textiles into SEG slots.
Watch the video about Platypus
For quality printing on panels or textiles, turn to our bePartners print.

And ready is the stand!
Conclusion? Rome wasn't built in a day, but your stand was! 😉 In fact, in an hour, you have already built this without any tools.
Open the 'body' of the stand in beCAD
Want to draw something yourself, but don't have a beCAD account yet? Request a beCAD account and get started right away.
Kick-off
Want to get started yourself? Simply start with our Kick-off packages. With a Kick-off package, you are always on the right track. All packages were put together based on our expertise, so you can build many different set-ups with a small stock. You will receive the Kickoff package with b62 frames, all necessary connectors and all kinds of accessories to complete the stand. Each package also includes a technical drawing and a panel plan (in .PDF and .DXF).
The System brochure
You can read all the steps in this blog post in detail in our general System brochure.